Filtering you Logs

I came across this feature today and thought I would share it with you.

The standard way we are taught to set up logging for Cisco IOS devices is something along the lines of,

(config)#logging buffer 5
(config)#logging trap error

where you state where you want to log to and then what level of messages you wish to log in the range 0 to 7, with 0 the most critical and 7 debug messages.

This is all fine until you find you want to log a specific alert that is informational (level 6), but you don’t want to log every level 6 event that happens. My example of this was I wanted to log a specific ACL match but not link sate or other notification level alerts (ACL’s log at level 6 / informational by default).

Cisco in there wisdom have though of this for us and given us the “discriminator” command to allow us to manage logging in more detail. The outline is that we can create a named “discriminator” that will filter out / capture events based on things like the facility, the mnemonics, a string with in the msg-body, or the severity level. This can then be used in further logging statements to determine what happens to these messages. So lets have a quick example to see how it works. As I said in my case it was an ACL I wanted to log from so lets go for that.

First we can set up an access list with a logging statement in it and assign it to an interface

(config)#ip access-list extended ACS_Critical
(config-ext-nacl)#permit ip any any eq bootps log
(config-ext-nacl)#permit ip any any
(config-ext-nacl)#exit
(config)#int vlan 888
(config-if)#ip address 192.168.5.254 255.255.255.0
(config-if)#ip access-group ACS_Critical in
(config-if)#exit

So we now have an access list that will log any DHCP traffic received coming in on the VLAN 888 interface, In my cace VLAN 888 is a critical VLAN that client pc’s will end up in if there are problems with network authorisation. So testing for DHCP traffic will let me know if the VLAN is being used and therefore if there is a authorisation issue. (last line of checking)

As I said before though ACL’s log at level 6, but if you watch a switch you will see a lot of lthese messages appearing in the day to day running of the switch and most of them you don’t need to worry about. Generally I would only save to buffer and forward to a syslogging server any level 5 (notification) or higher messages. But I do want to see the ones from this ACL…. We can set it up to do this as below

(config)#logging trap 5
(config)#logging discriminator ACS msg-body includes ACS_Critical
(config)#logging host 192.168.5.50 discriminator ACS

The Trap statement sets the default level for logging to the syslog server, the logging discriminator creates the discriminator called ACS and will filter incoming events for a message body containing ACS_Critical (name of the access list), and we then apply this to the syslog host when we set it up. Now all the default level 5 – 0 events will be logged plus the specific ACL’s generated ones.

A single host can have one discriminator assigned to it, but this can have multiply statements, and much like an access list these can allow or deny event to be passed, the commands are “includes” as used above, or “drop” to prevent a message getting logged. I find it especially useful for filtering logging to the syslog servers, as these log files can get huge if you are not careful.

Attached here is a CISCO document with more examples of setting this up.

Hope you found that intresting, and now I’m of to the seaside with wife and baby for a few days to fly my new kite 🙂 have a great weekend all.

DevilWAH

PS. I promise once I get back I will be getting on with my CCNP ROUTE posts as I said I would. Just been a busy week that I will tell you all about soon. I have also been asked to set up a web server and a few other projects so time has been tight. But I have had time to do some reading. I think I will start of with a review of sub-netting before I hit ROUTE core topics.

Visiting the Outside from the Inside (or DNS re-writing)

For a while now I have had an idea in the back of my head to sort out a long standing issue. However due to the fact this has been and issue on a secondary network, and only affected myself (to which I had a easy work around as you will see), I have not pressed to hard to find the solution. However I had promised my self that after my exam last week I would sit down and sort it out once and for all.

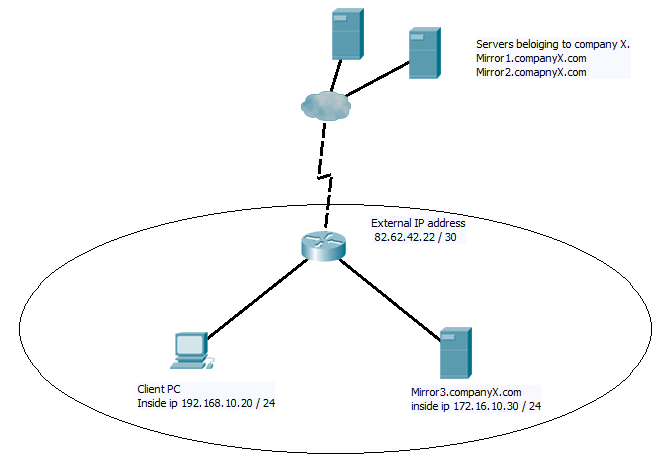
So here’s the situation, on a small network you have a client in one network, a web server in a second subnet and a single router acting as both the Internet gateway router, the firewall and handling all internal routing. Now this web server is of course accessible to the outside world as many web servers are. However the Domain name of the web server is not a domain I have control over. It is in fact a mirror of a 3rd party website. So they deal with all the DNS settings.

Fig.1

So of course the first thing to do is insure that outside users can connect in to the Webserver, and the internal clients can connect to the internet. So we require a basic NAT/PAT set up. Some thing along the lines of.

!
! First we set up the interfaces with there IP addresses and determin if they are
! inside or outside for NAT
!
(config)#int Dialer 1
(config-if)#description ## Internet link #
(config-if)#ip address 82.62.42.22 255.255.255.252
(config-if)#ip nat outside
!
!
(config)#int F0/0
(config-if)#description ## Client network #
(config-if)#ip address 192.168.10.254 255.255.255.0
(config-if)#ip nat inside
!
!
(config)#int F0/1
(config-if)#description ## Web Servers #
(config-if)#ip address 172.16.10.254 255.255.255.0
(config-if)#ip nat inside
!
! next we set up a list of IP address to be NATed from inside to outside
!
(config)#ip access-list standard NAT_IP’s
(config-std-nacl)#permit 192.168.10.0 0.0.0.255
(config-std-nacl)#exit
!
!
! Now set up the client NAT’ing to allow internet access for the clients and a
! static port forward, so all Packets comming in on the external IP address
! to port 80 get directed to the internal server.
!
!
(config)#ip nat inside source list NAT_IP’s interface Dialer 1 overload
(config)#ip nat inside source static tcp 172.16.10.30 80 82.62.42.22 80 extendable
!
!


So far all straight forward. Outside users can get to the web server and inside clients can use the internet (assuming firewall rules and so forth allow it). But what happens if the inside client tries to go to the web address Mirror3.companyX.com? Well if we assume you have not set up an internal DNS zone for companyX.com. Then the internal client will use CompanyX’s DNS server, to resolve the name to the external IP address of the network 82.62.42.22, just as an outside user would. This create a problem, due to how the router processes the steps on NAT and Routing, it will not correctly forward the packets between the client and the server. Instead you will end up with a host unreachable error (if you want more detail what is happening please comment and I will add it in). So how can you allow the internal hosts to browse the web server then?

Well you have 4 (OK I am sure there are more 😉  but these are the main ones) solutions.

1. Simply point the client web browser to the internal IP address of the server. As I was almost the only person who ever needed to get to the server from the inside this was the method I have been using up until now. However this does not scale well, and neither is it pretty, so I knew there had to be a better way.

2. You could set up a DNS zone for companyX.com with a record for mirror3.companyx.com using it’s internal IP address . By pointing your internal clients to this DNS server they would  pick up a rout able IP and browse the site. This is a standard method of DNS, and in many cases would be the preferred solution. However in this case it means setting up a Zone for a name you do not own. You also have to be careful to insure the inside clients can still resolve the mirror1 and mirror2 IP addresses. With out carefully planning this can get messy, especially if you have multiply mirrored servers from multiply domains.

3. Carry out NAT hair-pinning. This was original my first choice, and I do intend to come back to this as there are benefits to this method. But as I will cover also some issues with it. As I mentioned above trying to use the outside IP address of the server from the inside client results in issues to do with routing and NAT translations. Because the packets aren’t passing between the inside and outside the router can’t carry out correct NAT translations. However with a bit of cleaver configuration, and by using a loop back interface assigned to the NAT outside. You can with the use of multiply NAT statements and a static route get the router to pass the packet twice through the NAT algorithm and have it routed correctly. While this is a nice solution, its has the issue of huge CPU overheads for the router. Routing and the NAT has to be carried out in software with this method meaning that apart from in cases where there is very low traffic you need to be very careful if you implement this. (as I mentioned I will be covering how to set this up in a later post)

4. DNS re-writes! There is a not very well documented but very useful feature of NAT, called DNS re-writing, which does exactly what it says and by default is enababled. DNS response packets are checked by the router and any matching the NAT statements for the payload IP address will get re-written.  However this will not work on PAT statements, only on pure one to one NAT. So the configuration above will NOT invoke this feature as it is. To get it working we need to add one more command.

!
!
(config)#ip nat inside source static 172.16.10.30 82.62.42.22 extendable
!
!


Now with this command added the router will replace any IP address inDNS requests coming from outside the network that contain 82.62.42.22 with the internal IP address of 172.16.10.30. Now both the external users and the internal clients can use the same DNS server to resolve the address, and each will end up with the correct (but Different) IP address to be able to contact the web server.

To me solution 4 seems to be the neatest. Both companies keep full control of there networks and DNS settings, and there is much less over heads for the router to worry about. However note two issues.

First although we can still use PAT mappings on the IP external and internal address. So for instance where above we have a mapping set up “(config)#ip nat inside source static tcp 172.16.10.30 80 82.62.42.22 80 extendable” We could also have another mapping such as “(config)#ip nat inside source static tcp 172.16.10.40 22 82.62.42.22 22 extendable” Where SSH traffic goes to 172.16.10.40 and HTTP goes to 172.16.10.30. However any DNS request will use the plain NAT mapping so will always get replaced in the response with the 172.16.10.30 address in our set up. So you need to be aware of this and plan for it.

Second by using a NAT statement, all incoming traffic to any port will be translated through NAT. So you should insure that either an ACL or Firewall is blocking all traffic apart from what you want to come through.

So none are perfect but like with every thing in networking, you chose the one that fits best. And if you can’t find one, then your not looking hard enough. Or maybe you just need to invent a new method 😉

DevilWAH

Trouble Shooting with ACL’s (part 2, naughty CISCO and there firewall)

OK so following on from here  Trouble shooting with ACL’s (part 1).

To recap for un-know reasons packets had begun to get lost on one of my firewalls, and by using a combination of ACL’s applied to interfaces, logging commands and debug commands, I had established that while icmp packets sent from the router to the inside network where coming back in the interface. they where then some how getting lost with out any notifications.

Fig 1

So the last think I had done was enable the “#debug ip packets 150” on the router where 150 was an access list to capture any traffic to or from the 192.168.10.254 address. From this I was receiving (after a display of the packet going and coming) the following last line from the debug.

000801: Sep 13 12:40:35.452 UTC: pak 64A7D05C consumed in enqueue feature , packet consumed, CCE Firewall(2), rtype 0, forus FALSE, sendself FALSE, mtu 0, fwdchk FALSE.

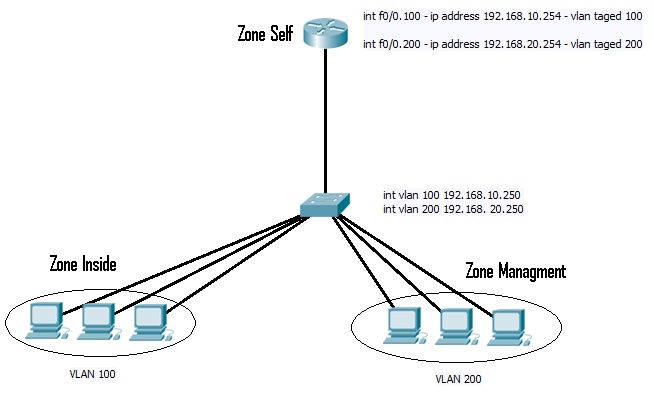
This didn’t really help to much to start with, as any google searches on various parts of that got me no where. I then spent several moments looking at the firewall policy’s. I knew that the router set up as a fire wall, places any connected interfaces in to the “self” zone.  So although the interfaces 192.168.10.254 and 192.168.20.254 are servicing two manually configured zones (“inside2 and “management”), the ports them selves are actual part of the “self” zone. So I was looking for any policies between the “inside” and “self” and the “management” and “self” zones.

All I could find was a single policy that was assigned between the “inside” and “self” zone. However the direction for this was from the “inside” to “self“, that allowed ICMP and denied every thing else (so inside network can’t manage the router). So this still did not seem to explain the issue I was seeing, as the default policy unless configured is “self” is allowed to talk to any thing.

However after much searching on the internet I finally came across this.

"Although the router offers a default-allow policy between all zones and the self zone, if a policy is configured from any zone to the self zone, and no policy is configured from self to the router’s user-configurable interface-connected zones, all router-originated traffic encounters the connected-zone to self-zone policy on its return the router and is blocked. Thus, router-originated traffic must be inspected to allow its return to the self zone."

From Cisco’s documentation.

It goes on to describe how if a policy is applied in to “self“, then a policy must also be applied outgoing from self to the zone to allow return traffic to be inspected… So yes that little policy I had noticed above really was causing all the trouble. And guess how it got there?

Well it had originally been an ACL applied to the interface. But when I ran CISCO SDM to help configure Easy-VPN, it had asked to make changes to the fire wall to insure still worked. And created the policy for me and applied it.. Which is the reason for the title of the post. I don’t generally like to use the SDM, but for learning it is useful. However this just shows how important it is to check the configs first and insure you keep  record of exactly what it is doing in case problems arise.

Solution was simple, either remove the policy above and replace it as an ACL assigned to the interface, or others wise set up an out going policy from “self” to “inside“, to either allow all traffic and inspect (or just allow the traffic you want to go to self).

In my view you don’t want any traffic from “inside” to “self“, apart from ICMP. This allows you to check a user can see the DFGW, but prevents any management traffic, so stops any attacks on the router from users or compromised systems inside your network. (Oh if you use IP helper address for DHCP the router must also be able to see these through your policy).

But yes all working fine now and lots more learnt about fire wall policies. Been a slight distraction from my CCNP switch studies but these are still going well. Just 7 points to go over before the exam, all simple ones just want to go through configuring them once more. Wish me luck!!

DevilWAH

Setting up Lock and Key

I remember searching around for ages looking for this solution a few years back, so I thought I would share it with you. Bear in mind that there are much more secure solutions around, such as 802.1x port based authentication. However these require a lot more setting up, not to mention the kit to support it. For what it is “Lock and Key” is one of these ideas that does exactly what it says on the tin..

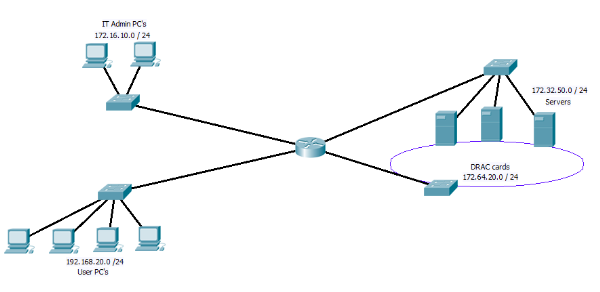
So what exactly is it that “Lock and key” does any way. The idea behind it is to allow you to on demand open up access between subnet / networks. May be it is clearer if we look at the following digram.

Figure 1

In Figure 1 we have the IT PC’s, the users PC’s, the servers and the DRAC cards all on separate networks. If you have not come across DRAC cards before, they are an additional card that can be fitted to Dell servers, that have there own redundant NIC, if the server should crash, you can connect to the DRAC card and force a hard reboot among other things. Very useful for remote management of server! However as you can image not some thing you want to allow users near!!

So looking at the digram above you may place an access list on the incoming traffic from the user network (192.168.20.0) to block any access to the DRAC network. While leaving the IT admin PC’s able to reach them. But what happens if you are at a users PC, the server has crashed and you need to reboot it? This is where the “Lock and Key” idea come in.

By using a dynamic Access list along with the user name auto command. you can on the fly open up the blocking access list you have created to allow the PC you are working on have access to the Drac network.

First we need to set up the a dynamic IP access list under global config, remember this access list has to be applied to the interface connection to the user PC’s, we will be applying it in the “in” direction.

ip access-list extended Lock-key
dynamic Dracacess timeout 60 permit ip any 172.64.20.0.0 0.0.0.255 log
deny  ip any 172.64.20.0 0.0.0.255
deny ip any 172.16.10.0 0.0.0.255
permit ip any any

So before “lock and Key” is active users are prevented from accessing the IT unit PC’s and the Drac network, but have access to every thing else.

Next we set up the user we are going to use as the “Key”

username Dracs secret CISCO
username Dracs autocommand access-enable host timeout 15

So here we set up the user Drac and add the auto command to run when they log in. The 15 minute time out here is the idle time out. However as we have set an absolute time out above in the access list its self, this will log out the user after 60 minutes if they are active or not.

Lastly we need to go in to the interface that faces the users network and assing the Access list, and set the VTY line for telnet access and to use the local user database. so from global config again.

interface <ID>
ip access-group Lock-key in

exit

vty 0 15

transport input telnet

login local

exit

Now to use it is simple, from a users PC start a telnet session with the router, at the user name and password prompt users the user name of Drac and password configured. The connection will be droped by the user but you an extra line will be added to the access list along the lines of.

permit ip host xxx.xxx.xxx.xxx 172.64.20.0.0 0.0.0.255 log

Any you user PC now has access as long as it is sending data or until the limit of 60 minutes.

Of course you may not like using telnet and it is possible to use SSH (but then the user PC needs a ssh client installed), you can also change the port that the router listens for telnet or SSH on a VTY line. You can also apply the auto command to the VTY line so any one who logs on through that VTY line will trigger the lock and key. If you do this then you will need to set up some VTY lines to use one port with the autocommand config, and some other VTY lines to use a different port with out the autocommand. Other wise you will not be able to mange the router!!!

This Link covers some more examples.

As I said at the beginning there are much better ways to do this, 802.1x as i mentioned is just one of them and some thing I will cover in more detail soon.  But for a small/medium size networks, where cost is an issue, but you still want to add an extra bit of security. They are a nice way to restrict users, while allowing network admins to carry on working efficiently away from there desks.

DevilWAH

USB Security Issues.

The US defence officials have recently released information about a security breach they suffered back in 2008.

Pentagon USB breach

It seems some one placed a USB flash drive in to a government computer that contained malicious code placed on it by a forigen intelligence agency. This spread to other systems and opened up the Defence network to allow data to be transferred to rogue servers.

USB seems to have become the new medium for spreading virus and malware, and to be honest its hardly a surprise. Many companies seem to react to the growing security threats by creating stronger and stronger network gateways. In many cases these become so secure and so restrictive that they prevent the staff they are designed to protect, from actual carrying out there jobs.

And then the problems really start, people start to despair at the work provided service and will carry out the downloads at home and bring them in on there USB sticks. Completely circumvention the security policies in place.

There is of course the option to restrict access to only authorised USB devices, but to actual set this up is a major headache, and a large cost is involved. Especially when the Client PC’s are spread over a number of sites and you don’t have complete and utter control over them. Also by restricting the USB devices you hit the same issue as when you lock down the firewalls. People unable to carry out there jobs effectively.

It’s surprises me the number of times a valid request from a user to run an application or run some java code, gets turned down with a “its against company security policy”, when what the help desk engineer really means is ” I don’t know what the security policy is and I don’t have the time to look in to this for you fully to see if we can help”.

When “security policies” effect the efficiency in how some one can do there work, or even worse push people to find ways around them, then there is a problem with them. Good security policies, and set ups should be invisible to the end user, they should also be implemented in such a way that when users have valid reasons that cause them to come up against them, there are clear processes of how to take it forward for quite and decisive resolution.

Losing your users confidence in this area, and they will go from helping to being the major week link in the system. Many companies seem to see there security policy as a fight against the stupidity and malicious activity of there user, shutting them out of this loop of IT. Rather the users should be a central part of the policies, when you think that a huge % of breaches are caused by user “error”, there education should be where at least some of the money that funds the security should go.

I know at home using some common sense I have managed to survive many years now with out any security issues with only a basic consumer hardware firewall (linksys), and some well known free virus software. Where as friends and family regularly hit issues despite having paid for every virus scanner under the sun.

Spending 10’s of thousands of pounds on software to block USB devices, and more on IPS scanning, and still more on you hardened firewall, you will still never cover all the bases, while giving your users the freedom they need, and as soon as they hit that wall they will look for ways around it.

Making a network secure is easy, making a secure network that is usable… That what require the skill.

DevilWAH