More Generating Test Data.

So Last time I mentioned you can generate traffice between two routers using TCP small Servers. This does work fine but there are some limitations, it can’t genetrate large amounts of traffic, it puts a high load on the CPU and it does not tell you much once it has completed.

A second method I came across is “TTCP” (Test TCP) which is avalible on many of the more recent IOS versions (11.2 upwards). This method not only gives you more control over the data that is sent, but also will provided you with infomation on how the trasfer of data went once it is complete. TTCP is also avalible for Windows and Linux/Unix, which means you can test between various end stations on the network.

It is all very simple to set up, simply at the “>” or “#” prompt type “TTCP”, and then follow the prompts. You will need to set up one router as the sender first, and then the second as the reciver. You can leave all the settings as default (you may want to reduce the “nbuf” setting as the default of 2048 can take some time to complete, espicaly on a slow link).

Once complete you will get an out put of time taken and bandwith achived among other stats. Again this is a very simple tool to give you a indication as to the state of a link, you can find more details in the below link to the CISCO site.

Cisco TTCP Document

Upgrading Redundant Supervisors on 6500’s

I need to know how to upgrade the IOS on CISCO 6500’s, So here is the outline along with a download of the official PDF from CISCO.

First confirm what IOS image is running, which supervisor is running as active and the redundancy mode that is active. This can be achieved with the following commands.

Router#show version
Router#show module
Router#show redundancy 

You should now know the current IOS version and the module numbers of the supervisor units and which one is active.
Now we need to set up the boot variable (so the correct IOS boots) and copy the new IOS over if necessary.

Router#show bootvar  (Find out the current IOS booting)

Router#copy start tftp (copy the current start up configuration to TFTP for safe keeping)

Router#copy tftp disk0:          (Copy the new IOS to the two supervisors)
Router#copy tftp slavedisk0:

Router#no boot system disk0:old_IOS.bin
Router#boot system disk0:new_IOS.bin   (set up the new boot variable on the active supervisor)

Router#copy run start  (syncs running configuration on both supervisor units)

Now the boot variables are set up and the new IOS images are on the supervisors we can upgrade each in turn, starting with the one currently set as the standby.

Router#hw-module module  reset  (chose standby supervisor to reset)

Standby supervisor will now reboot and restart running the new IOS image. During this time the redundancy mode will fall back to RPR mode due to the mismatch in IOS images running. You can see this by running the “show” commands above.

Once the standby is fully back up and running you can now update the active module, this is done by forcing the standby to become active, this will result in a reload of the current active supervisor.

Router#redundancy force-switchover (switches standby to become active and reloads current active)

(you will need to swap console cables over to the standby supervisor as only the currently active one can be consoled in to.)

Again use the above “show” commands to check the modules have reloaded correctly, both supervisors are running the same IOS version, and the correct redundancy method. Now the original active router will be the standby. If you wish you apply the last command above to force a second switch over back to the original.

And there it is, upgrade of IOS with out taking the switch off line. Although it is suggested it is done out of hours as there may be some minor traffic interruptions during the switch over.

Here is the CISCO PDF, with more detail and outputs of the commands..

DevilWAH

Filtering you Logs

I came across this feature today and thought I would share it with you.

The standard way we are taught to set up logging for Cisco IOS devices is something along the lines of,

(config)#logging buffer 5
(config)#logging trap error

where you state where you want to log to and then what level of messages you wish to log in the range 0 to 7, with 0 the most critical and 7 debug messages.

This is all fine until you find you want to log a specific alert that is informational (level 6), but you don’t want to log every level 6 event that happens. My example of this was I wanted to log a specific ACL match but not link sate or other notification level alerts (ACL’s log at level 6 / informational by default).

Cisco in there wisdom have though of this for us and given us the “discriminator” command to allow us to manage logging in more detail. The outline is that we can create a named “discriminator” that will filter out / capture events based on things like the facility, the mnemonics, a string with in the msg-body, or the severity level. This can then be used in further logging statements to determine what happens to these messages. So lets have a quick example to see how it works. As I said in my case it was an ACL I wanted to log from so lets go for that.

First we can set up an access list with a logging statement in it and assign it to an interface

(config)#ip access-list extended ACS_Critical
(config-ext-nacl)#permit ip any any eq bootps log
(config-ext-nacl)#permit ip any any
(config-ext-nacl)#exit
(config)#int vlan 888
(config-if)#ip address 192.168.5.254 255.255.255.0
(config-if)#ip access-group ACS_Critical in
(config-if)#exit

So we now have an access list that will log any DHCP traffic received coming in on the VLAN 888 interface, In my cace VLAN 888 is a critical VLAN that client pc’s will end up in if there are problems with network authorisation. So testing for DHCP traffic will let me know if the VLAN is being used and therefore if there is a authorisation issue. (last line of checking)

As I said before though ACL’s log at level 6, but if you watch a switch you will see a lot of lthese messages appearing in the day to day running of the switch and most of them you don’t need to worry about. Generally I would only save to buffer and forward to a syslogging server any level 5 (notification) or higher messages. But I do want to see the ones from this ACL…. We can set it up to do this as below

(config)#logging trap 5
(config)#logging discriminator ACS msg-body includes ACS_Critical
(config)#logging host 192.168.5.50 discriminator ACS

The Trap statement sets the default level for logging to the syslog server, the logging discriminator creates the discriminator called ACS and will filter incoming events for a message body containing ACS_Critical (name of the access list), and we then apply this to the syslog host when we set it up. Now all the default level 5 – 0 events will be logged plus the specific ACL’s generated ones.

A single host can have one discriminator assigned to it, but this can have multiply statements, and much like an access list these can allow or deny event to be passed, the commands are “includes” as used above, or “drop” to prevent a message getting logged. I find it especially useful for filtering logging to the syslog servers, as these log files can get huge if you are not careful.

Attached here is a CISCO document with more examples of setting this up.

Hope you found that intresting, and now I’m of to the seaside with wife and baby for a few days to fly my new kite 🙂 have a great weekend all.

DevilWAH

PS. I promise once I get back I will be getting on with my CCNP ROUTE posts as I said I would. Just been a busy week that I will tell you all about soon. I have also been asked to set up a web server and a few other projects so time has been tight. But I have had time to do some reading. I think I will start of with a review of sub-netting before I hit ROUTE core topics.

Trouble Shooting with ACL’s (part 2, naughty CISCO and there firewall)

OK so following on from here  Trouble shooting with ACL’s (part 1).

To recap for un-know reasons packets had begun to get lost on one of my firewalls, and by using a combination of ACL’s applied to interfaces, logging commands and debug commands, I had established that while icmp packets sent from the router to the inside network where coming back in the interface. they where then some how getting lost with out any notifications.
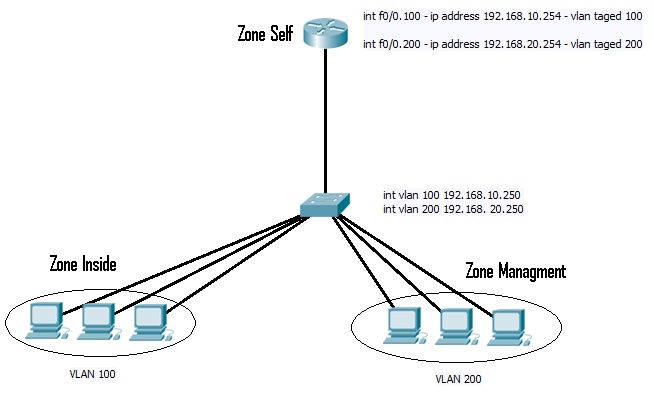
Fig 1

So the last think I had done was enable the “#debug ip packets 150” on the router where 150 was an access list to capture any traffic to or from the 192.168.10.254 address. From this I was receiving (after a display of the packet going and coming) the following last line from the debug.

000801: Sep 13 12:40:35.452 UTC: pak 64A7D05C consumed in enqueue feature , packet consumed, CCE Firewall(2), rtype 0, forus FALSE, sendself FALSE, mtu 0, fwdchk FALSE.

This didn’t really help to much to start with, as any google searches on various parts of that got me no where. I then spent several moments looking at the firewall policy’s. I knew that the router set up as a fire wall, places any connected interfaces in to the “self” zone.  So although the interfaces 192.168.10.254 and 192.168.20.254 are servicing two manually configured zones (“inside2 and “management”), the ports them selves are actual part of the “self” zone. So I was looking for any policies between the “inside” and “self” and the “management” and “self” zones.

All I could find was a single policy that was assigned between the “inside” and “self” zone. However the direction for this was from the “inside” to “self“, that allowed ICMP and denied every thing else (so inside network can’t manage the router). So this still did not seem to explain the issue I was seeing, as the default policy unless configured is “self” is allowed to talk to any thing.

However after much searching on the internet I finally came across this.

"Although the router offers a default-allow policy between all zones and the self zone, if a policy is configured from any zone to the self zone, and no policy is configured from self to the router’s user-configurable interface-connected zones, all router-originated traffic encounters the connected-zone to self-zone policy on its return the router and is blocked. Thus, router-originated traffic must be inspected to allow its return to the self zone."

From Cisco’s documentation.

It goes on to describe how if a policy is applied in to “self“, then a policy must also be applied outgoing from self to the zone to allow return traffic to be inspected… So yes that little policy I had noticed above really was causing all the trouble. And guess how it got there?

Well it had originally been an ACL applied to the interface. But when I ran CISCO SDM to help configure Easy-VPN, it had asked to make changes to the fire wall to insure still worked. And created the policy for me and applied it.. Which is the reason for the title of the post. I don’t generally like to use the SDM, but for learning it is useful. However this just shows how important it is to check the configs first and insure you keep  record of exactly what it is doing in case problems arise.

Solution was simple, either remove the policy above and replace it as an ACL assigned to the interface, or others wise set up an out going policy from “self” to “inside“, to either allow all traffic and inspect (or just allow the traffic you want to go to self).

In my view you don’t want any traffic from “inside” to “self“, apart from ICMP. This allows you to check a user can see the DFGW, but prevents any management traffic, so stops any attacks on the router from users or compromised systems inside your network. (Oh if you use IP helper address for DHCP the router must also be able to see these through your policy).

But yes all working fine now and lots more learnt about fire wall policies. Been a slight distraction from my CCNP switch studies but these are still going well. Just 7 points to go over before the exam, all simple ones just want to go through configuring them once more. Wish me luck!!

DevilWAH